
What messenger do you use at work? goorm uses a messenger called Slack. Slack has many advantages, but I especially like the fact that users can expand its functionality by adding multiple bots. Why is it good? If you link multiple alarms to Slack, you don’t have to move between apps to check schedules or alarms.
Slackbot is not only a simple alarm, but also a reminder that regularly informs you of various company indicators, a bot that informs you of the cafeteria menu at a set time, a bot that tells you who has a birthday today, a task management and meeting management bot, etc. Slackbot is a messenger and a meeting management bot. It is playing a great role as a work assistant. goorm is also automating work with Slackbot to maximize work efficiency.

Creating such a bot is not that difficult. So I’m going to share that method with you. And that’s by using our product, goormIDE!
The Slackbot we will create is an app with a simple function that responds happily when you say ‘hello’. It is an app with a very simple structure that places a Node.js container in goormIDE and communicates with Slack through a library called Blot.
by Mono
| ☁️ What is Slackbot? ‘Bot’ is an abbreviation for robot. refers to a program that repeats a specific task. Bots are automated and perform repetitive tasks without the user having to execute them directly. Slackbot is a bot that can be used in Slack like a chatbot. Slackbot can perform various functions by connecting to Google Calendar, Notion, ChatGPT, etc. |
| ☁️ What is goormIDE? goormIDE is a cloud-based integration provided by goorm. It is a development environment (IDE). This is a service that allows you to develop programs on web pages anytime, anywhere by providing a cloud-based development environment through a technology called containers. |
1. Create a Slack workspace first
First, I will create a Slack workspace for personal use. Wouldn’t it be nice to share a basic Slackbot that simply says hello to your colleagues or acquaintances? A Slack workspace is a space where conversations and work get done. It can be said to be a kind of ‘group.’
The following is how to add a workspace to Slack. We have explained the method in detail using a service called Arcade, so please follow it step by step. It won’t be that difficult.
❶ Enter https://slack.com/intl/ko-kr/ in the address bar of your web browser and open the Slack homepage.
❷ Click the [Create new workspace] button.
❸ Log in to Slack with your own account. If you don’t have an account, sign up for Slack first.
❹ Enter the workspace name (mono app in this case) and click [Next].
❺ Add your name and profile photo. Press [Next].
❻ I will skip adding colleagues. Click [Skip this step].
❼ Don’t hesitate and click [Skip this step].
❽ Enter a random channel name (mono) and click [Next].
❾ OK. You followed along. A workspace named ‘mono app’ and a channel named ‘mono’ were created.
2. Add apps to your Slack workstation
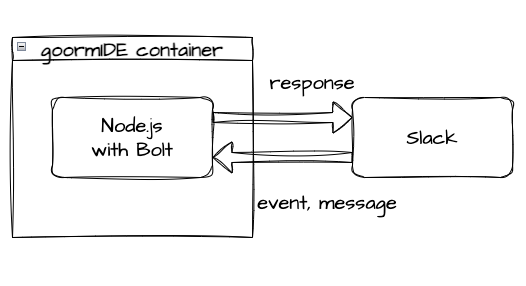
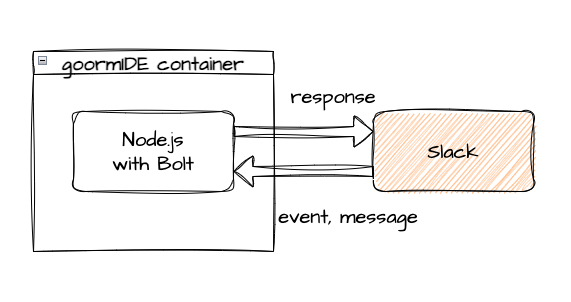
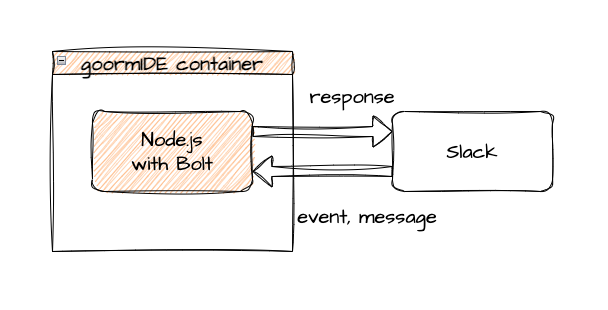
Now I’m going to actually create my app in Slack and add the necessary permissions. This is the colored ‘Slack’ part in the following picture. This app sends and responds to simple events and messages. In the picture, the arrows represent the ‘permissions’ required for this app.
It may be convenient to give the app full permissions, but you must be careful as security issues may arise. So, it is best to always grant the minimum amount of permissions.
❶ Open the https://api.slack.com web page in your web browser address.
❷ Click the [Your apps] button.
❸ Click [Create an App] to create the Slack app. Create it.
❹ Select the app creation method. Here, we will select [From Scratch].
❺ Enter the app name. I’ll name it ‘mononomo’.
❻ Select the workspace to add the Slack app. Select the workspace created earlier.
❼ Click [Create App] to create the app.
❽ Congratulations on creating the app. Click [Got it!] to close it.
❾ You need to set the permissions of the Slack app. Scroll the webpage to find [Permissions] and click it.
❿ Click [Add an OAuth Scope].
⓫ You must give the Slack app writing permission to write to the workspace. Select [chat:write].
⓬ Write permission has been added to the Bot Token Scopes item.
⓭ Scroll to the top to find the [Install to Workspace] button and press it. The Slack app you created will be added to our workstation.
⓮ When asked for permission to access the workspace, click [Allow].
⓯ The Slack app has been added to the workspace. Let’s go back to Slack.
⓰ An app category that didn’t exist before will appear in Slack, and you will see the mononomo Slack app you created. Can you see it too?
3. Add permissions to Slack API app
This time, we will further update the Slack app section and API server. First, add Socket mode and related permissions so that the app responds in real time.
❶ This time, click the [Socket Mode] menu.
❷ Activate the [Enable Socket Mode] toggle button.
❸ For the token name, ‘nap’ or any other Enter the name and click [Generate].
❹ The token has been created. Click [Copy] to copy the token. Pay special attention to security to prevent tokens from being leaked. You will need it later, so write it down in notepad.
❺ Click [Done] to complete token creation.
❻ This time, click the [Event Subscriptions] button.
❼ There is also a [Enable Event] toggle button. Let’s enable it.
❽ Click the [Subscribe to bot events] item.
❾ Click the [Add Bot User Event] button.
❿ Find and select message.channels. Message.channels is added as an Event.
⓫ In the same way, message.groups, message.mpim, and message.im permissions are also added.
- message.groups
- message.im
- message.mpim
⓬ Once you have added all four message events, click [Save Changes] to save them.
⓭ You must reinstall the app to reflect the changes. Click [reinstall your app].
⓮ [Allow] all requested permissions.
⓯ You can also click ‘Success!’ A notification popped up, right?
4. Find out about Slack tokens
To connect with goormIDE logic and Slack API, three tokens are required along with the Slackbot package. The tokens we set in the notepad earlier are things like SLACK_APP_TOKEN. The three tokens are:
- SLACK_SIGNING_SECRET
- SLACK_BOT_TOKEN
- SLACK_APP_TOKEN
| ☁️ What is a token? Tokens are like coins that can be used instead of currency. This is a cast. In IT, a token refers to a protocol for ‘authentication’ that identifies a user and contains access rights. |
Each token can be checked on the next page.
- SLACK_SIGNING_SECRET Basic Information Page [Signing Secret] Item
- SLACK_BOT_TOKEN OAuth & Permissions Page [OAuth Tokens for Your Workspace]
- SLACK_APP_TOKEN Basic Information Page [App-Level Tokens]
Excluding the tokens previously recorded in the notepad, find the remaining tokens and record them in the notepad.
❶ SLACK_SIGNING_SECRET can be found on the Slack API page → [Basic Information].
❷ Copy the key from the [Signing Secret] menu and write it down in a notepad.
❸ Scroll down to see App-Level Tokens. The item appears. You can see the nep token created earlier. Tap the token name (nep).
❹ This token is SLACK_APP_TOKEN. Take notes together.
❺ Lastly, you need to find SLACK_BOT_TOKEN. [OAuth & Go to the [Permissions] menu.
❻ Scroll down and you will see Bot User OAuth Token. This is the last SLACK_BOT_TOKEN we are looking for. Copy.
5. Creating an app server to handle the Slackbot logic
An app added to Slack requires an app server to process calculations, such as notifying today’s meal information at a set time every day. The intention is to place the server in the goormIDE.
From now on, we will create a Node.js container in goormIDE and write simple code using JavaScript and the Bolt library. The app server catches the conversation (message part of the picture) and returns a simple answer (response part of the picture).
5.1 Create a Node.js goormIDE container
First, create a Node.js container in goormIDE.
❶ Open the ide.goorm.io page in the Chrome web browser and log in.
❷ Click [Node.js] in the new container creation area.
❷ Let’s quickly create a container. Click [Node.js] to the right of the [New Container] button.
❸ Enter the container name. The name can only contain letters, numbers, hyphens (-), and underscores (_). Here, we named it Slackbot.
❹ Click the [Additional Modules/Packages] toggle button.
❺ Check the Node.js button to upgrade to 16.x.
❻ Click [Create]. Create a container.
❼ After a while, the container was created. Shall we click [Run Container] to run the Node.js container?
❽ The Slackbot container we just created ran successfully. Did you follow along well?

3.2 I’ll ‘paste’ the Slack app server code!
Code is originally created by copying and pasting. Please copy and paste it into main.js. This code responds when you tag a Slackbot and send a ‘hello’ message. Add code to goormIDE Node.js.
❶ Click the Slackbot (container name) directory in the project.
❷ Click the main.js file to load the contents.
❸ Delete all existing code, and paste the following Slack app server code. Yes.
const { App } = require('@slack/bolt');

const app = new App({  // Settings for various servers. Make sure these tokens are properly configured.
  token: process.env.SLACK_BOT_TOKEN,
  signingSecret: process.env.SLACK_SIGNING_SECRET,
  socketMode: true,
  appToken: process.env.SLACK_APP_TOKEN,
  port: process.env.PORT || 3000
});

// Detecting the 'hello' message.
app.message('hello', async ({ message, say }) => {
  // say() is a function that sends a Slack message in the form of blocks. Set the blocks and send them.
  await say({
    blocks: [
      {
        "type": "section",
        "text": {
          "type": "mrkdwn",
          "text": `Hey there <@${message.user}>!`
        },
        "accessory": {
          "type": "button",
          "text": {
            "type": "plain_text",
            "text": "Click Me"
          },
          "action_id": "button_click"
        }
      }
    ],
    text: `Hey there <@${message.user}>!`
  });
});

app.action('button_click', async ({ body, ack, say }) => {
  // Acknowledge the action
  await ack();
  await say(`<@${body.user.id}> clicked the button`);
});

(async () => {
  // Start your app
  await app.start();

  console.log('⚡️ Bolt app is running!');
})();
❺ Save the code with the Ctrl+S shortcut. Or, press [File] → [Save] in the top menu. It’s not difficult, right?
6. Add Slackbot token and run the app server
It’s almost over. Now we will add the token we wrote down in Notepad and run the app server. Then we can use the bot we created in Slack.
First you need to install Slack Blot. Blot is a framework developed by Slack. It helps you create Slack apps easily. This framework supports a variety of languages, including Python and Java, as well as JavaScript.
Enter the following command in the goormIDE terminal to install the Slack Blot package.
npm install @slack/boltNext we need to add a token. For convenience of use, we will create a script file called slackbot.sh and register the token as an environment variable.
❶ Click the right mouse button in the goormIDE project window.
❷ Click [New File].
❸ Enter slackbot.sh as the file name and press enter↵.
❹ Copy and paste the following source code.
export SLACK_SIGNING_SECRET=[insert torken]
export SLACK_BOT_TOKEN=[insert torken]
export SLACK_APP_TOKEN=[insert torken]

node main.js
❺ Delete ‘[insert Token]’ from each item and enter the secret key you wrote down.
❻ Once you have entered all the tokens, press the Ctrl+S shortcut to save the changes.
❼ Run bash in the terminal. Enter the slackbot.sh command and press Enter.
bash slackbot.sh❽ If it says Now connected to Slack, it has run normally.
7. Let’s check if the bot is working well in Slack
We ran the Slack app server earlier. Let’s go back to Slack Messenger and say hello to the Slackbot in a random channel. @Slackbot Tag Slackbot by entering its name and typing hello. Do you, like me, get answers from Slackbot?
❶ Go back to Slack and click on the #mono or #general channel.
❷ Enter @mononomo (@Slackbot name) in the channel.
❸ Tag the Slackbot @mononomo and say hello. After entering, press the enter↵ key.
❹ When greeted with “hello,” Slackbot responds with “Hey there @ID.”
❺ This time, click the [Click Me] button on the right side of Slackbot.
❻ The message ID clicked the button is displayed. Does it work for you too?
Going a step further
I have created and used the most basic Slackbot so far. Don’t you have a desire to “make a Slackbot like this”? How about using this opportunity to create various apps by referring to various Slackbot developers available on the Internet? ☁️