
It was at COMMIT that I came across KoAlpaca. I looked into Koalpaca while preparing for a presentation at the COMMIT seminar with Junbeom Lee, the creator of KoAlpaca. Then a thought suddenly occurred to me. Wouldn’t it be possible to use sLLM (small language model) like KoAlpaca in GoorumIDE? When I’m obsessed with something, I only focus on that one thing, but I didn’t have the energy right now. Time passed and it wasn’t until the end of 2023 that I tried using KoAlpaca myself. I’ve never properly learned Python or LLM, but with ChatGPT, I guess I can do something.
by Snow
💬 This article is a review and installation guide for using KoAlpaca, a Korean sLLM, in goormIDE's GPU container. goormIDE GPU container is in beta service status as of December 2023 and can be used for free for 12 hours each week. KoAlpaca is licensed by Apache and is available for non-commercial use only.
The leak of Meta’s large-scale language model (LLM) LLaMA, which occurred in early 2023, took an unexpected direction for Meta. Although it was not unintentional, the power of ‘openness’ was strong. Based on the leaked model, numerous derivative LLMs such as Vicuna-13B and Alpaca began to pour out. It was a moment when the market, which had been leading the LLM market with the power of large capital, was shaken. Meta, who witnessed the ripple effect of open source, soon changed the direction of its LLM strategy to ‘openness’.
Thank you, Meta
That’s how Alapaca was born. The purpose was a little different. It was created with the purpose of allowing academics, who were alienated from the monopoly of the LLM model by tech companies, to freely ‘research’ the LLM. Alapaca is an sLLM that fine-tunes the leaked Meta’s LLaMA-7B model with an Instruction-following dataset. Instruction-following means that it has been trained to respond well to the user’s commands. In order for LLM to break away from being centered on large corporations, training and distribution costs must be lowered, and to do so, LM and high-quality Instruction-following are needed.
Alpaca solved the problem using high-quality datasets created with LLaMA-7B and existing LLM. This was the reason why I was able to use KoAlpaca, the Korean version of Alpaca, in the single GPU container of goormIDE.
💬 What is LLM?
It stands for Large Language Model. It is called a large language model. LLM focuses on the relationships between words in a sentence. When a prompt is given, a sentence is created by repeatedly inferring the appropriate word that follows the word.
I’ll check if it’s running
From the beginning, I did not have a clear goal of doing something with my LLM. It started with the simple idea that if I could install and use LLM for free on goormIDE, I would be able to do various things without fear of information being leaked. Utilization could be considered gradually. First of all, it was important that Koalpaca operated in the goormIDE.
The GPU of the goormIDE container is NVIDIA Tesla T4. The graphics memory is 10GB and the storage capacity is about 40GB. Some models of LLM had a capacity of over 100GB, so it was a problem whether they could be stored in goormIDE.
There was no need to worry too much about which model to use. There was no alternative other than KoAlpaca based on Polyglot-ko 5.8B, which has the smallest capacity among sLLMs. 5.8B means there are 58 billion parameters. The reason the number of parameters is important in LLM is because it is directly related to the quality of the inference results. (More parameters are not necessarily better.)
💬 What are parameters in LLM?
In the human brain, they correspond to the synapse responsible for thinking. The more synapses you have, the smarter you will be, but just as a high IQ does not mean you are good at studying, the number of parameters is not an absolute indicator of LLM performance.
An error welcomes me
On the KoAlpaca github(https://github.com/Beomi/KoAlpaca), there is an example code released by Junbeom Lee and Installation instructions are provided. Prior to installation, update the system package to the latest version. The command is sudo apt update. Errors greeted me from the beginning.
W: GPG error: https://developer.download.nvidia.com/compute/cuda/repos/ubuntu2004/x86_64 InRelease: The following signatures couldn't be verified because the public key is not available: NO_PUBKEY A4**********63CC

E: The repository 'https://developer.download.nvidia.com/compute/cuda/repos/ubuntu2004/x86_64 InRelease' is no longer signed.

N: Updating from such a repository can't be done securely, and is therefore disabled by default.

N: See apt-secure(8) manpage for repository creation and user configuration details.
It was kindly written that authentication could not be done because there was no public key. When I asked ChatGPT, I was told in more detail that ‘this occurred because the CUDA repository public key was not in the system.’ Then it told me to run the following command. I did as my partner told me.
sudo apt-key adv --fetch-keys https://developer.download.nvidia.com/compute/cuda/repos/ubuntu2004/x86_64/7fa2af80.pubSimilarly, an error occurred. I did as instructed, but it was the same. Only after asking again did he give me the correct answer. The problem was resolved by inserting A4**********63CC after NO PUBKEY in the error code into [Public Key] of the next command and executing it.
sudo apt-key adv --keyserver keyserver.ubuntu.com --recv-keys [Public Key]Then I entered the sudo apt update command again. Finally, I was able to update the system package.
Install the libraries required by Koalpaca
The next thing to do was to install the relevant libraries needed for Koalpaca LLM. The libraries that need to be installed are as follows.
- torch: PyTorch deep learning framework. PyTorch is a tool for building and training neural network models.
- transformers: Provides several model-related tools used for pre-training and fine-tuning of natural language processing (NLP) models.
- tokenizers: A library that separates strings into tokens and processes them.
- accelerate: Accelerates model training.
- safetensors: A library that performs ‘safe tensor operations’ by extending the functionality of PyTorch’s torch package.
The command is like this. With this, you are ready to use koalpaca.
pip install -U torch transformers tokenizers accelerate safetensorsIt can’t be this easy
KoAlpaca’s example source was saved as a Python source code file called koalpaca.py, and the code was executed with the python3 koalpaca.py command. After a while, I was relieved to see the LLM model downloaded. Execution stopped after about 5 minutes.
I was greeted with an error saying that it could not run because the graphics driver version was too low. I asked my partner for a solution. I was told to obtain and install the manufacturer’s driver. Intuitively, I felt that it would be faster to find a solution on Google than on ChatGPT, so I got help from Google.
The graphics driver could be updated to the latest version with the following command. Due to a container image issue, the related libraries were not updated, so a warning was displayed that the driver and library versions did not match.
sudo apt-get install nvidia-driver-535-server -yI ran koalpaca.py again. I guess I waited about 5 minutes. The results appear in the terminal. To the question “What is deep learning?” he answered, “Deep learning is a field of machine learning that learns complex relationships between inputs and outputs through artificial neural networks.” It was a moment of relief.
Although I started blindly, I was able to run KoAlpaca more easily than I was worried about. All that remained was what to do with it. And it was about implementing the desired function.
Let’s evaluate customer satisfaction as positive or negative!
After working as an IT reporter, editor at a publishing company, and planner, my first job after moving to DevRel was to plan and run goorm’s monthly developer event called COMMIT. Every month, we invite senior developers in the industry and listen to their experiences, thoughts, and know-how. After the event, feedback from attendees is collected and analyzed. Let’s look at what was good and what was disappointing, and what needs to be improved.
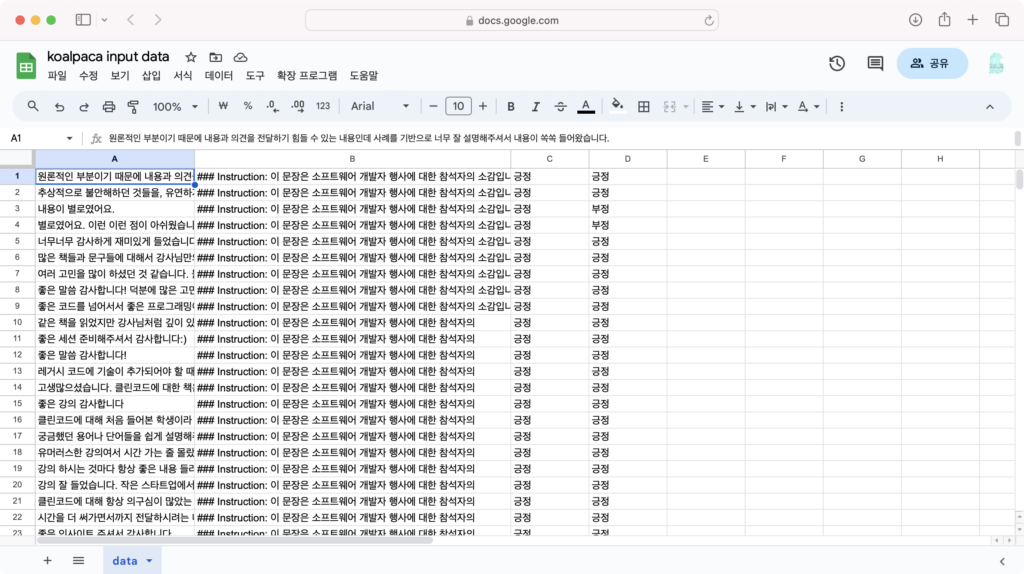
The multiple choice questions were easy, but the problem was the subjective questions. Wouldn’t it be less work if you evaluate your thoughts as positive or negative with KoAlpaca and only look at the negatives? Wouldn’t that be good enough? So what we decided to do was to import subjective questions from the satisfaction survey results document saved in a spreadsheet, analyze them with LLM, and evaluate them as either positive or negative.
Begin pair programming in earnest with ChatGPT
From the beginning, I did not tell ChatGPT to change to the desired program all at once. Although it wasn’t my intention, I changed the example code little by little, checked the results, and modified the code. At first, the prompt for inputting a string was changed to receive an array. Next, I installed the gspred library and added related code to load data from the spreadsheet. Afterwards, the prompt was modified to load specific column data from the spreadsheet and enter it as input data.
Even though ChatGPT is weak in other programming languages, it is said that its Python code is at the level of a 2-3 year developer, and this is indeed true. Although the code was modified differently from what was intended, and sometimes errors occurred, the function was implemented by repeating the process of asking for the error code and solution each time. I even fixed some very simple things myself.
😵 The difficulty was the ‘prompt’. KoAlpaca is not as smart as ChatGPT. I tried changing the prompt like this and that to check the results, but I only got the wrong answers. I was worried that it might be a limitation of the 5.8B model.
The answer was on KoAlpaca GitHub. When I wrote the prompt by dividing it into input and response, I started giving answers that were close to my intention.
It took 2 minutes and 50 seconds to answer the first question due to the model loading process. Afterwards, it took about 4 seconds to answer each question. It took a total of 5 minutes and 10 seconds to answer the 38 satisfaction survey results.
The following is the actual satisfaction survey and analysis of ChatGPT. Input is a satisfaction survey subjective sentence that is the subject of analysis by LLM. Response is the response that is the result of analysis.
### Input: Thank you so much, I had a lot of fun listening.
### Response: This sentence indicates a positive reaction from the attendee.
The shorter and clearer the sentence, the more accurately it was analyzed. I read COMMIT’s subjective satisfaction survey sentences collected so far and recorded the correct answers as positive or negative. And compared with the positive and negative ratings by KoAlpaca. How accurate were KoAlpaca’s evaluations compared to human evaluations? The accuracy was approximately 30-60%.
Of course, there were other results. In fact, much of what was analyzed did not yield the desired response. The goal of increasing work efficiency ultimately failed.
### Input: Many thanks for sharing your thoughts on various books and passages. It feels like I've had the opportunity to read the books again and see them from a different perspective thanks to your insights. Also, I appreciate you bringing together your own thoughts and various contents into cohesive material, as well as posing questions that developers should consider. Thank you.

### Response: Please provide a response to this comment.

### Input: "It was very boring. It wasn't helpful at all."

### Response: In my opinion, it seems that the content of the lecture did not meet your expectations. I will strive to fill the content with more engaging material next time.
The longer the sentence, the more the answer was completely wrong, without evaluating the positive or negative questions asked in the answer.
This type of error is called hallucination, or lying, in generative AI. However, I do not readily agree with the word ‘lie.’ The definition of a lie is this: “Making up something that is not true as if it were true. Or something like that.”
The mechanism of generative AI only creates sentences by inferring the appropriate word following a word. The word ‘lie’ is not correct because we cannot tell whether it is true or not.
But is it different for people? People also make various errors in the process of solving a problem while searching for an answer. Additionally, sentences written by people often contain a mixture of positive and negative words. It is a sentence like “~ It was disappointing, but this was good.” If people were asked to evaluate such sentences only as positive or negative, they would inevitably become concerned. How can AI accurately judge such sentences?
Although I didn’t get the results I wanted, the experience of pair programming with ChatGPT was better than I expected. Rather than finding the cause of the problem and worrying about it alone, it was a pretty good experience to exchange various opinions with a colleague called ChatGPT and find the answer together.
The following is a method of installing KoAlpaca in the GoormIDE GPU container, reading all strings in a specific column of a spreadsheet, and evaluating them as either positive or negative.
1. Create a goormIDE GPU container
❶ Enter ide.goorm.io in the address bar of the Chrome web browser to open the goormIDE homepage.
❷ A GPU is required to use an LLM such as KoAlpaca. Click [NVIDIA Tesla T4] to the right of [New Container].
❸ Enter a name for the container. Here, we named it Koalpaca.
❹ Click the [Create] button to create a GPU container.
❺ It will take several minutes for the GPU container to be created. Please wait patiently.
❻ The container has finally been created. Shall we click [Run Container]? Is goormIDE launched?
2. System package updates
❶ Enter the sudo apt-get update command in the terminal of goormIDE.
sudo apt-get update❷ An error appears saying that the following signatures cannot be authenticated because they do not have a public key.
W: GPG error: https://developer.download.nvidia.com/compute/cuda/repos/ubuntu2004/x86_64 InRelease: The following signatures couldn't be verified because the public key is not available: NO_PUBKEY A4**********63CC

E: The repository 'https://developer.download.nvidia.com/compute/cuda/repos/ubuntu2004/x86_64 InRelease' is no longer signed.

N: Updating from such a repository can't be done securely, and is therefore disabled by default.

N: See apt-secure(8) manpage for repository creation and user configuration details.
❸ In the terminal, type sudo apt-key adv –keyserver keyserver.ubuntu.com –recv-keys. (Do not press enter↵ key)
sudo apt-key adv --keyserver keyserver.ubuntu.com --recv-keys❹ Copy the key (A4**********63CC) after NO PUBKEY in the authentication error message.
❺ Put a space after the command entered in Step ❸ and copy it. Paste one NO_PUBKEY. Press the enter↵ key to run the command.
❻ Run the sudo apt-get update command again. This time, the package will be updated to the latest version without an error.
3. I will update my NVIDIA drivers
❶ Enter sudo apt-get install ubuntu-drivers-common -y in the terminal. This is a package that manages drivers for Ubuntu OS.
sudo apt-get install ubuntu-drivers-common -y❷ Enter sudo ubuntu-drivers devices. Check installable drivers.
sudo ubuntu-drivers devices❸ To use LLM, you need the latest version of GPU driver. I will install version 535. Enter sudo apt-get install nvidia-driver-535-server -y in the terminal.
sudo apt-get install nvidia-driver-535-server -y❹ When asked for the country of keyboard manufacture, enter the number 59 to select Korean.
❺ Select 1. Korean as the keyboard type. Enter the number 1.
❻ Although some errors occurred, the driver was installed. When I enter the nvidia-smi command, it says that the driver and library versions do not match.
4. Data is read from a spreadsheet
❶ Click [Create or select a project] in the Google Cloud Console.
❷ press [New project].
❸ Enter a project name and click [Create]. Here, it is named koalpaca-googlesheet.
❹ The project has been created. In the notification panel, click [Select a project].
❺ Scroll down the page to find [API navigation and enablement] and click on it.
❻ Click [Enable APIs and services].
❼ Search for google sheets, find [Google Sheets API], and click.
❽ Click [Enable] to enable the API.
❾ Click [Create Credentials].
❿ [Application Data] Click and press the [Next] button.
⓫ Create a random service account name. Then press [Create and Continue].
⓬ Specify the role for the service account.
⓭ Under Basic, select [Editor]. I will give you both read and write permissions. Then press [Continue].
⓮ Click [Done].
⓯ Click [User Credentials] .
⓰ The service account you just created will appear. Copy the email address of your account.
⓱ In the spreadsheet where the data you want to analyze for positives and negatives with Koalpaca is stored, click [Share] and add the email you just copied. For the role, select [Editor].
⓲ Return to the Google Cloud Console and click the service account [email address].
⓳ Among the tabs at the top. Click [Key].
⓴ Click [Add Key] and select [Create New Key].
㉑ key defaults to json format. Press [Create].
㉒ Click Create to download the key. You will need to upload the key to goormIDE in the future, so keep it safe.
5. Also install Pytorch and Hugging Face related libraries
❶ Enter the pip install gspread command to install the gspread package.
pip install gspread❷ Install the libraries required for koalpaca with the pip install -U torch transformers tokenizers accelerate safetensors command.
pip install -U torch transformers tokenizers accelerate safetensors6. Save the Python code and run the code
❶ Right-click in the project navigation window and select [New File].
❷ Enter koalpaca.py as the file name. .py is an extension of Python code.
❸ Paste the following example code into koalpaca.py and save it by pressing the keyboard shortcut Ctrl+S.
```python
import torch
import gspread
from transformers import pipeline, AutoModelForCausalLM

# Connect to Google Spreadsheet
json_file_path = "credentials.json"  # Google authentication file
gc = gspread.service_account(json_file_path)
spreadsheet_url = "https://docs.google.com/spreadsheets/d/10********************************?pli=1#gid=0"  # Spreadsheet URL
doc = gc.open_by_url(spreadsheet_url)
worksheet = doc.worksheet("data")  # Sheet name

# Select the Hugging Face model
MODEL = 'beomi/KoAlpaca-Polyglot-5.8B'
model = AutoModelForCausalLM.from_pretrained(
    MODEL,
    torch_dtype=torch.float16,
    low_cpu_mem_usage=True,
).to(device=f"cuda", non_blocking=True)

model.eval()
pipe = pipeline(
    'text-generation',
    model=model,
    tokenizer=MODEL,
    device=0
)

def generate_text(prompt):
    # Option to decide whether to sample the text
    # If set to True, one of the multiple candidates is randomly selected
    # If set to False, the token with the highest probability is selected
    response = pipe(
        prompt,
        do_sample=True,

        # Maximum number of tokens to generate
        # Generated tokens will be generated until the number of new tokens is less than this value
        max_new_tokens=256,

        # Higher values make the generated text more random,
        # while lower values generate more consistent text
        temperature=0.7,

        # Higher values increase the diversity of the generated text,
        # while lower values select only high probability tokens to generate more consistent text
        top_p=0.9,

        # If set to True, the entire generated text is returned,
        # If set to False, only a part is returned
        return_full_text=True,

        # Token ID indicating the end of text generation
        eos_token_id=2,
    )
    generated_text = response[0]['generated_text']

    return generated_text

def analyze_sentiment(sample):
    prompt = f"### Instruction: This sentence is a participant's impression of a software developer event. Please analyze whether this sentence is positive or negative.\n ### Input: {sample}\n ### Response:"
    generated_text = generate_text(prompt)

    return generated_text

def get_sentiment_result(generated_text):
    if 'positive' in generated_text:
        return "Positive"
    elif 'negative' in generated_text:
        return "Negative"
    else:
        return "Difficult to determine"

def ask_and_analyze_sentiment(samples):
    for index, sample in enumerate(samples):
        generated_text = analyze_sentiment(sample)
        sentiment_result = get_sentiment_result(generated_text)

        # Record analysis content in column B of the spreadsheet
        cell = f"B{index + 1}"
        worksheet.update(cell, [[generated_text]])

        # Record positive or negative in column C of the spreadsheet
        cell = f"C{index + 1}"
        worksheet.update(cell, [[sentiment_result]])

        print(f"sentences_to_analyze[{index}], {sentiment_result}")

# Create an array for sentiment analysis of multiple sentences
sentences_to_analyze = worksheet.col_values(1)

# Print sentiment analysis results (only positive or negative)
ask_and_analyze_sentiment(sentences_to_analyze)
```
❹ Right-click again in the project explorer and click [Import file].
❺ | Click [Select File] and select the key (json file) downloaded from the Google Cloud Console earlier.
❻ Click [Confirm] to upload the key.
❼ The file was successfully imported. Press [OK].
❽ The name of the uploaded key file must be changed to be the same as the name of json_file_path in the code. Copy credentials.json.
❾ Select the Google authentication key, right-click, and click [Change Name].
❿ Change the Google authentication key name by pasting the copied name.
⓫ Change the spreadsheet URL to load data.
⓬ The name of the ‘sheet’ containing the data in the spreadsheet is entered here. After making all changes, press the shortcut key Ctrl+S to save.
7. Let’s run koalpaca.py
❶ Let’s run koalpaca.py to evaluate the sentences in the spreadsheet as positive or negative. Enter python3 koalpaca.py in the terminal.
❷ When you first run the command, the model is downloaded from Hugging Face. It may take a long time to download the model and run it, so be patient.
❸ After receiving the model, read the data in column A of the spreadsheet and evaluate whether it is positive or negative one by one. Make sure your spreadsheet records the reasons for the evaluation (column B) and the positives and negatives (column C). ☁️